Document Preferences
In PrintSmith Vision, the information that makes up printed estimates and invoices comes from two sources: a set of document preferences and a report file (.rpt).
Use the Document Preferences tab to control what to include in the invoice or estimate. For example, you can control whether your invoices include PO numbers, customer account numbers, date wanted, or prices for charges.
Note: Document preferences define the format of a document, so the terms document preferences, document format, and form are sometimes used interchangeably.
Use the report to control the layout and appearance of the invoice or estimate (as well as some of its contents).
PrintSmith Vision includes some pre-defined formats and associated reports that you can adapt to your needs. (For example, the Default Invoice format is associated with PSV_DefaultInvoice.rpt.) ePS recommends that you try these formats and then make any necessary adjustments. Alternatively, you can use the supplied formats as a starting point for new formats you create.
Editing or Creating Document Preferences
This section explains how to edit the settings for a particular document format or how to create a new format. A new format is based on an existing format so the procedure is identical except for step 3 below.
- In the Report Manager window, click the Document Preferences tab.
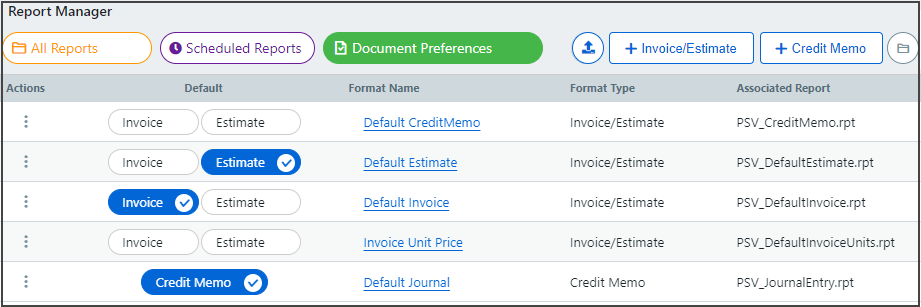
- To change the settings of an existing format:
- Under the Format Name column, click the format you want to edit. The Document Preferences window opens.
The Page tab control the contents of the entire page. For information, see Page Tab.Note: The Default Credit Memo format is just a variation of an estimate or invoice format. It is not for credit memos for journal entries.
- If you want to change the name of the format, edit it in the Format Name field. (This name is the way the format is identified elsewhere in PrintSmith Vision, for example, when selecting a format for an estimate or invoice.)
- The Associated Report field displays the name of the report file that is associated with the format. Unless you customized your invoices or estimates, leave this field as it is.
Note: If you are selecting settings for credit memos, the Associated Report field is not displayed.
- Under the Format Name column, click the format you want to edit. The Document Preferences window opens.
- To create a new format:
- Select a format type by clicking either the Invoice/Estimate or Credit Memo button.
- In the Format Name field of the Page tab, enter a name for your new format. (This name is the way the format is identified elsewhere in PrintSmith Vision, for example, when selecting a format for an estimate or invoice.)
The Page tab control the contents of the entire page. For information, see Page Tab.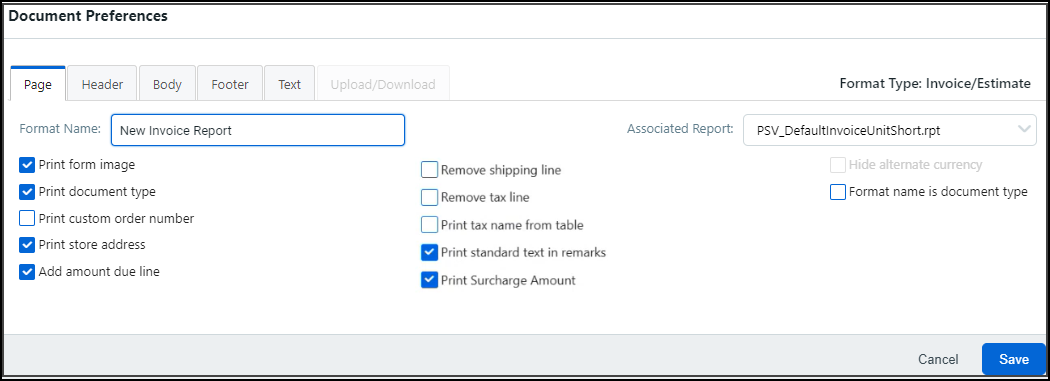
- In the Associated Report field, select the name of the report file that you want to associate with the format. Unless you customized your invoices or estimates, leave this field as it is.
- Click the Header tab to control the contents of the top of the document. For information, see Header Tab.
- Click the Body tab to control the information that is included in the main part of the document. For information, see Body Tab.
- Click the Footer tab to control the contents of the bottom of the document. For information, see Footer Tab.
- Click the Text tab to include a store name and/or message in the document. For information, see Text Tab.
- Use the Upload/Download tab to upload and download report files when customizing documents.
Note: When you select Credit Memo, some fields on the tabs are unavailable because they do not apply to credit memos.
- Click Save to save your changes.
Page Tab in Document Preferences
Use the Page tab in the Document Preferences window to control aspects of the entire page.
- Click the Page tab in the Document Preferences window.
- Select or clear the following check boxes:
- Print form image
Select this check box to print an image of a form in addition to the data that fills out the form. Usually, you will want to pre-print your document forms. PrintSmith Vision has several built-in images of the forms, however, that are supplied as part of the system. - Print document type
Select this check box to identify the kind of document being printed (for example, Invoice, Estimate, or Memo), which eliminates the need for different forms for different types of documents. If you are also printing a form image, be sure to pick an image that does not contain a document type to avoid double printing it. You can also substitute the name of the format for the document type by selecting the Format name is document type check box. - Print custom order number
Select this check box to include the suffix and/or prefix of the estimate or invoice number. This setting does not apply to credit memos. (You define suffixes and prefixes with Order Number Format preferences: Preferences > Settings > Accounting > Order Number Format.) - Print store address
Select this check box to include the store name and address that is defined on the Text tab in the Document Preferences window. - Add amount due line
Select this check box to print the amount due, less deposits and payments, after the invoice total. This setting does not apply to credit memos. - Remove shipping line
Select this check box to remove the shipping line from the document totals section. - Remove tax line
Select this check box to remove the tax line from the document totals. Only select this if you are setting up the system to hide the tax in individual line items. - Print tax name from table
Select this check box to include the descriptive text for tax elements in the document. A tax table can include different tax rates that can each have a separate description. This is the text that is included in the document. This feature is usually used in conjunction with Print total descriptions on the Footer tab.
This option is useful when you must show more than one tax. When multiple tax lines are defined for the document and multiple tax elements are defined for the tax table, PrintSmith Vision tries to put all of the tax lines in the footer. If there are not enough lines available, it puts the extra lines in the body of the invoice just above the subtotal along with the descriptive text from the tax table. - Print standard text in remarks
Select this check box to print the standard text defined on the Text tab in the Document Preferences window. For example, you can include a marketing or seasonal message. (This standard text is unique to each document format.) - Print Surcharge Amount
Select this check box to include the surcharge details in the standard invoice reports. When enabled, the surcharge amount is included in all default invoice-related reports.Note: If you are using a custom report, you will need to update it manually to include surcharge details.
- Hide alternate currency
If you are using alternate currency, select this check box to hide alternate currencies. (This setting applies only if you defined an alternate currency.) - Format name is document type
Select this check box to use the name of the format on the document instead of one of the PrintSmith Vision document types. For example, you can define a format named Packing List, use a built-in form image that has no name in the image, and then select the Format name is document type and Print document type check boxes. When documents are printed using this format, Packing List is printed on them instead of Invoice or Estimate.
- Print form image
Header Tab of Document Preferences
Use the Header tab in the Document Preferences window to control the contents of the top of the document.
- Click the Header tab in the Document Preferences window.
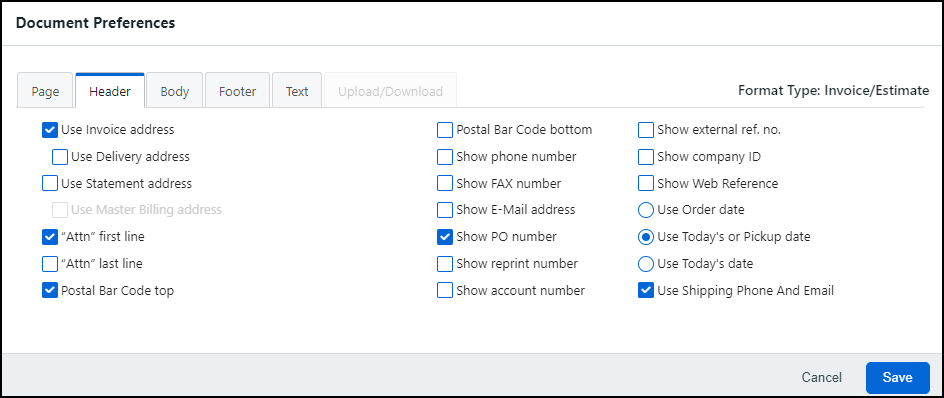
- Select the Use Invoice address check box to print the invoice address from the customer account. To also include the delivery address, select the Use Delivery address check box. These settings do not apply to credit memos.
- Select the Use Statement address check box to print the statement address from the customer account. If the Use Invoice address check box is cleared, you can select the Use Master Billing address check box to use the address of the master account instead of the customer address. These settings do not apply to credit memos.
- Select either “Attn” first line or “Attn” last line to indicate whether the name of the contact person or department should be placed at the top or bottom of each address block.
- Select the Postal Bar Code top or Postal Bar Code bottom check box to indicate whether the postal bar code from the zip code of the address is placed at the top or the bottom of each address block.
- Select or clear the following check boxes:
- Show phone number
Select this check box to print the phone number at the bottom of each address block. - Show FAX number
Select this check box to print the FAX number at the bottom of each address block. - Show E-Mail address
Select this check box to print the e-mail address at the bottom of each address block. - Show PO number
Select this check box to include the PO number in the document. Normally, this check box should be selected. This setting does not apply to credit memos. - Show reprint number
Each time a document is printed, PrintSmith Vision keeps track of the number of times the document was printed. Select the Show reprint number check box if you want to include the number of times that the document was printed just below the document number. This setting does not apply to credit memos. - Show account number
Select this check box to print the customer account number on the document. This setting does not apply to credit memos. - Show external ref. no.
Select this check box to print the customer’s external reference number on the document. This setting does not apply to credit memos. - Show company ID
Select this check box to print the ID that identifies your company. The company ID and its label are set with your Company preferences (Preferences > Settings > System > Company). This setting does not apply to credit memos. - Show Web Reference
If you handle Web orders (for example, from MDSF), select this check box to include the reference number from a Web order. This setting does not apply to credit memos. - Use Shipping Phone And Email
If you handle Web orders (for example, from MDSF), select this check box to include the phone number and email ID of the recipient in the invoice/estimate reports.
- Show phone number
- All documents must have a date. Select one of the following:
- Use Order date
To print the date the document was ordered. (The order date can be changed in a document.) - Use Today’s or Pickup date
To print the date the invoice was picked up or to print today’s date if a pickup date is unavailable. - Use Today’s date
To always print the current date on the document.
- Use Order date
Body Tab of Document Preferences
Use the Body tab in the Document Preferences window to control the information that is included in the main part of the document.
- Click the Body tab in the Document Preferences window.

- Select the Show description check box to include job descriptions and notes in the document. Normally, this check box is always selected.
- Select the Show stock check box to include a description of the stock. When the Show stock check box is selected, four additional check boxes are available to control what the stock description includes:
- Hide original count
Select this check box to remove originals from the stock description. - Hide number up
Select this check box to remove the up count from the stock description. - Hide color count
Select this check box to hide all references to colors in the stock description. - Add folded size
Select this check box to add the folded size to the job data displayed.Note: If all three Hide check boxes are selected, only the stock name is printed. The Show stock settings do not apply to credit memos.
- Hide original count
- Select or hide the following check boxes:
- Show prices
Select this check box to print the total for all line items that would otherwise show a price. If selected, no prices are printed for any line items. Only totals for the entire document are shown.Note: You can use the Show prices check box together with the No Totals check box on the Footer tab to set up a format for packing lists that contains only descriptive information without any prices.
- Hide multi-part jobs
Select this check box to automatically hide all jobs that are part of a multi-part job, except for the main (control) job. The prices of all hidden jobs are included in the main job price. This setting does not apply to credit memos. - Hide multi-part job prices
Select this check box to hide the prices on multi-part jobs and show the entire total in the main job. Use this to show all the parts of a multi-part job without breaking out the prices for each part. This setting does not apply to credit memos. - Show M price in unit column
Select this check box to print the unit price multiplied by 1000 in the unit column. Otherwise, the unit price is printed. This setting does not apply to credit memos. - Hide charges
Select this check box to hide all job level charges. Invoice level charges (charges that are not part of a job) are handled differently – they can only be hidden if they are markups. The price for each hidden charge is added to the job price. - Hide charge prices
Select this check box to hide the prices, but not the quantity and description of all job level charges. The price is added to the price shown for the job to which the charge belongs. If the charge would otherwise be hidden because it was manually hidden, or the Hide charges check box is selected, the charge is hidden. - Hide job markups
Select this check box to hide markup charges for a job. The total of the hidden charges is added to the job price. This setting does not apply to credit memos. - Hide invoice markup
Select this check box to hide all invoice-level markup charges. The markup amount is added proportionally to all prices that are printed. This setting does not apply to credit memos. - Hide cust discount
Select this check box to hide the customer discount by adding it proportionally to each line item that shows a price. This setting does not apply to credit memos. When hiding customer discounts, you may want to consider not showing detailed prices to avoid problems with accumulated rounding errors. - Hide tax in line items
Select this check box to add the tax to the price of each line item that has a price. Use this as part of a system-wide setup that adds the tax to all calculated prices.Note: This feature is intended primarily for international use.
- Adjust qty for overs
The Overs/Unders field in the Job window allows you to enter an amount by which the delivered quantity differs from the amount originally ordered thus adjusting the price. Select the Adjust qty for overs check box so that the quantity shown on the printed document matches the quantity that was delivered to the customer. This setting does not apply to credit memos.Note: The Adjust qty for overs check box does not affect the overs/unders calculated on the unit price for the quantity ordered, just what is shown in the document.
- Hide quantity
Select this check box to remove all job quantities from the document. This setting does not apply to credit memos. - Show tracking bar code
Select this check box to include the tracking bar code (if using Tracker) in the document. This setting does not apply to credit memos.
- Show prices
Footer Tab of Document Preferences
Use the Footer tab in the Document Preferences window to control the contents of the bottom of the document.
- Click the Footer tab in the Document Preferences window.
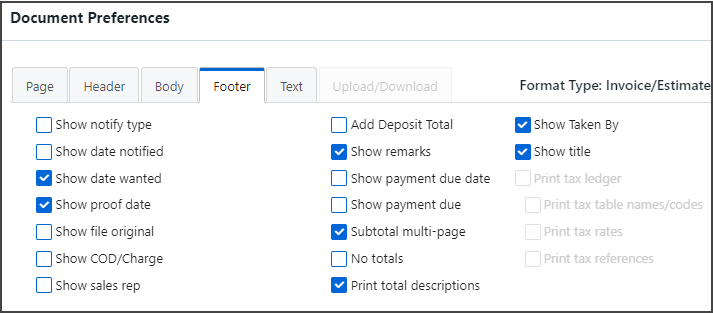
- Select or clear the following check boxes:
- Show notify type
Select this check box to print the shipping method that was requested. This setting does not apply to credit memos. - Show date notified
Select this check box to print the date the customer was contacted. (This date is updated via the Notify Customer option in the Pending Documents window.) This setting does not apply to credit memos. - Show date wanted
Select this check box to print the date the customer wanted the order. This setting does not apply to credit memos. - Show proof date
Select this check box to print the proof date. This setting does not apply to credit memos. - Show file original
If the File originals option is selected in the Invoice Summary tab, select the Show file original check box to print File Originals. This setting does not apply to credit memos. - Show COD/Charge
Select this check box to indicate whether the customer is allowed to charge the order or must pay upon delivery. Either Charge or COD is printed in the remarks block. This setting does not apply to credit memos. - Show sales rep
Select this check box to print the name of the sales representative assigned to the document. - Add Deposit Total
Select this check box to add a deposit line in the Document totals box instead of displaying the information in the Deposit box. This setting does not apply to credit memos. - Show remarks
If special instructions are entered in the Invoice Summary tab, select this check box to include these instructions in the document. - Show payment due date
Select this check box to include the payment due date (DATE DUE) below AMOUNT DUE in the totals section. (This setting does not apply to credit memos.) - Show payment due
Select this check box to print the amount due. This setting does not apply to credit memos. - Subtotal multi-page
Select this check box if you want to print the subtotal on each page at the bottom of the total block if the document has multiple pages. - No totals
Select this check box to prevent any total from being printed in the document. Generally, select this check box only for estimates. This feature is useful if you are producing multiple quotes for the same job by duplicating them. - Print total descriptions
Select this check box so that PrintSmith Vision supplies the text for Sub-Total, Tax, Total, and so on, and the text can be removed from the pre-printed form. This setting does not apply to credit memos. - Show Taken By
Select this check box to print the name of the person who took the order. This setting does not apply to credit memos. - Show title
Select this check box to print the description (name) of the document. This is the same description that is shown in account history. This setting does not apply to credit memos. - Print tax ledger
The Print tax ledger check box and the Print tax table names/codes, Print tax rates, and Print tax references check boxes apply only if you are using line-item taxation and want to include tax breakdowns in your documents.- Select the Print tax ledger check box so the document at a minimum includes the amount being taxed for each tax table, as well as the tax amount.
- Select the Print tax table names/codes check box to include the abbreviated names of tax tables (and codes if using) in the document. (If you associated the format with a TaxDetails report, the names will be included in the Tax column; if you associated the format with a TaxLedger report, the names will be included in the tax ledger in the bottom left corner of the document.)
- Select the Print tax rates check box to include tax rates in the tax ledger section of the document. (This check box does not apply if you associated the format with a TaxDetails report.)
- Select the Print tax references to include a tax reference (legend) in the Tax column and the tax ledger section of the document. (This check box does not apply if you associated the format with a Ta Details report.)
- Show notify type
Text Tab of Document Preferences
Use the Text tab in the Document Preferences window to specify two pieces of text:
- Store information (this applies to all document formats).
- Standard text that can be used for greetings, reminders, and so on (this can be different for each document format).
To provide text for documents
- Click the Text tab in the Document Preferences window.
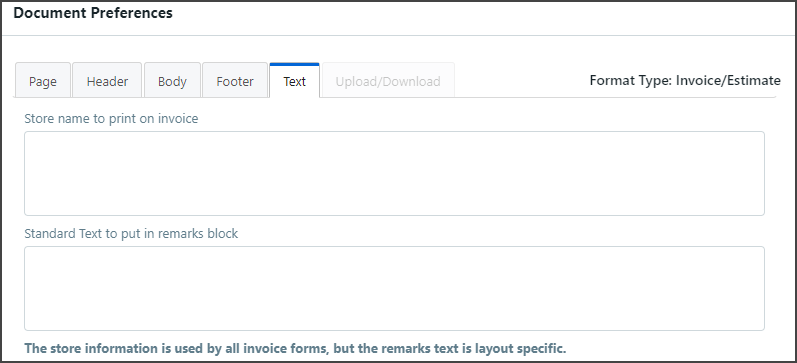
- In the Store name to print on invoice field, enter the text that is printed at the top of the document when the Print store address check box is selected on the Page tab in the Document Preferences window. If you do not enter any text in the Store name to print on invoice field, the text is taken from your Company preferences.
Note: Keep in mind that this store name text applies to all document formats.
- In the Standard Text to put in remarks block field, enter the text you want printed at the bottom of the remarks block of the document if the Print standard text in remarks check box is selected on the Page tab in the Document Preferences window. Examples of standard text might include Thank you for your order or Happy Holidays. (The standard text can be different for each document format.)
Upload/Download Tab of Document Preferences
In PrintSmith Vision, upload the report file you edited and download the report file you want to edit.
- Select Document Preferences in Report Manager.
- Click the Upload/Download tab.
- Do any of the following:
- Select the report you want to edit and click Download. The file is placed in your default Downloads folder. Then use i-net Designer to edit the report.
- Click Upload and select your file. (Its name cannot begin with PSV_.)
Using Document Preferences
Once you have formats that you like for estimates and invoices, set a default format for both estimates and invoices in the Estimator Printing preferences. The default format is then automatically selected in the Format drop-down list in the Estimate or Invoice Summary tab, but you can always select a different format there if necessary.